I've decided to write a small survey site using Blazor. Part of this is an excuse to learn Blazor.
As I learn with Blazor I will blog about it as a series of articles.
This series of articles is not intended to be a training course for Blazor - rather my thought process as I go through learning to use the product.
All articles in this series:
- Part 1 - State
- Part 2 - Better State
- Part 3 - Components
- Part 4 - Render Mode
- Part 5 - Client IP
- Part 6 - Azure Cosmos DB
- Part 7 - Azure SignalR Service
- Part 8 - bUnit - this article
- Part 9 - End to End Tests
- Part 10 - Bicep
- Part 11 - Azure DevOps
- Part 12 - Putting it all together
In modern development it would be difficult for any new technology to gain traction without an ability to unit test.
For Blazor that is bUnit.
I have to admit I was a little surprised to find that Microsoft didn't have its own tools for Blazor - rather they actually promote a 3rd party open-source tool:
"There's no official Microsoft testing framework for Blazor, but the community-driven project bUnit provides a convenient way to unit test Blazor components." Microsoft Docs
While I really like that Microsoft is embracing the open-source community, it does feel a little odd that they didn't have their own offering.
That being said, bUnit seems an exceptionally well developed and maintained tool.
I'd certainly recommend reading through the bUnit documentation site before making a start. The documentation is very good and quite quick to run through.
A summary
So bUnit works with xUnit, NUnit or MSTest - providing a number of helpers tools for Blazor component testing.
I believe that bUnit favours xUnit - which is fine for me as xUnit is my go-to unit testing framework for dotnet.
bUnit allows you to write your tests in 3 ways:
- C# style
- Razor Fixture
- Razor Snapshot
C# Style
This is a fairly traditional style which should be fairly recognisable to anyone with xUnit experience (below taken from the bUnit Docs):
using Xunit;
using Bunit;

namespace Bunit.Docs.Samples
{
  public class HelloWorldTest
  {
    [Fact]
    public void HelloWorldComponentRendersCorrectly()
    {
      // Arrange
      using var ctx = new TestContext();

      // Act
      var cut = ctx.RenderComponent<HelloWorld>();

      // Assert
      cut.MarkupMatches("<h1>Hello world from Blazor</h1>");
    }
  }
}
The key here is the TestContext - it is part of bUnit and provides all the magic needed to interact with the Blazor components.
Razor Fixture
These tests are written differently, they are written in the Razor syntax. The Fixture testing then allows you to make similar assertions that you can within C# style (sample taken from the bUnit Documentation Page):
@inherits TestComponentBase

<Fixture Test="HelloWorldComponentRendersCorrectly">
  <ComponentUnderTest>
    <HelloWorld />
  </ComponentUnderTest>

  @code
  {
    void HelloWorldComponentRendersCorrectly(Fixture fixture)
    {
      // Act
      var cut = fixture.GetComponentUnderTest<HelloWorld>();

      // Assert
      cut.MarkupMatches("<h1>Hello world from Blazor</h1>");
    }
  }
</Fixture>
The main difference here is that setup in done through Razor syntax.
Personally I favour the C# style - and at this time, I've not found a reason to use the Razor Fixture style. I suspect that it is largely a matter of personal taste.
Blazor Snapshot
These tests are also writen using Razor syntax - but rather than normal assertions, you specify the expected output (sample take from the bUnit Documentation Page):
@inherits TestComponentBase

<SnapshotTest Description="HelloWorld component renders correctly">
  <TestInput>
    <HelloWorld />
  </TestInput>
  <ExpectedOutput>
    <h1>Hello world from Blazor</h1>
  </ExpectedOutput>
</SnapshotTest>
Now this works very well for regression style testing.
I've used this across a number of my components to ensure that I pick up any accidental changes. For this I think that Snapshot testing works very well.
This has been exceptionally useful for testing my OptionGrid component. It’s probably my most complex component involving an amount of reflection and dynamic generation. Ultimately it provides the grid during the survey:
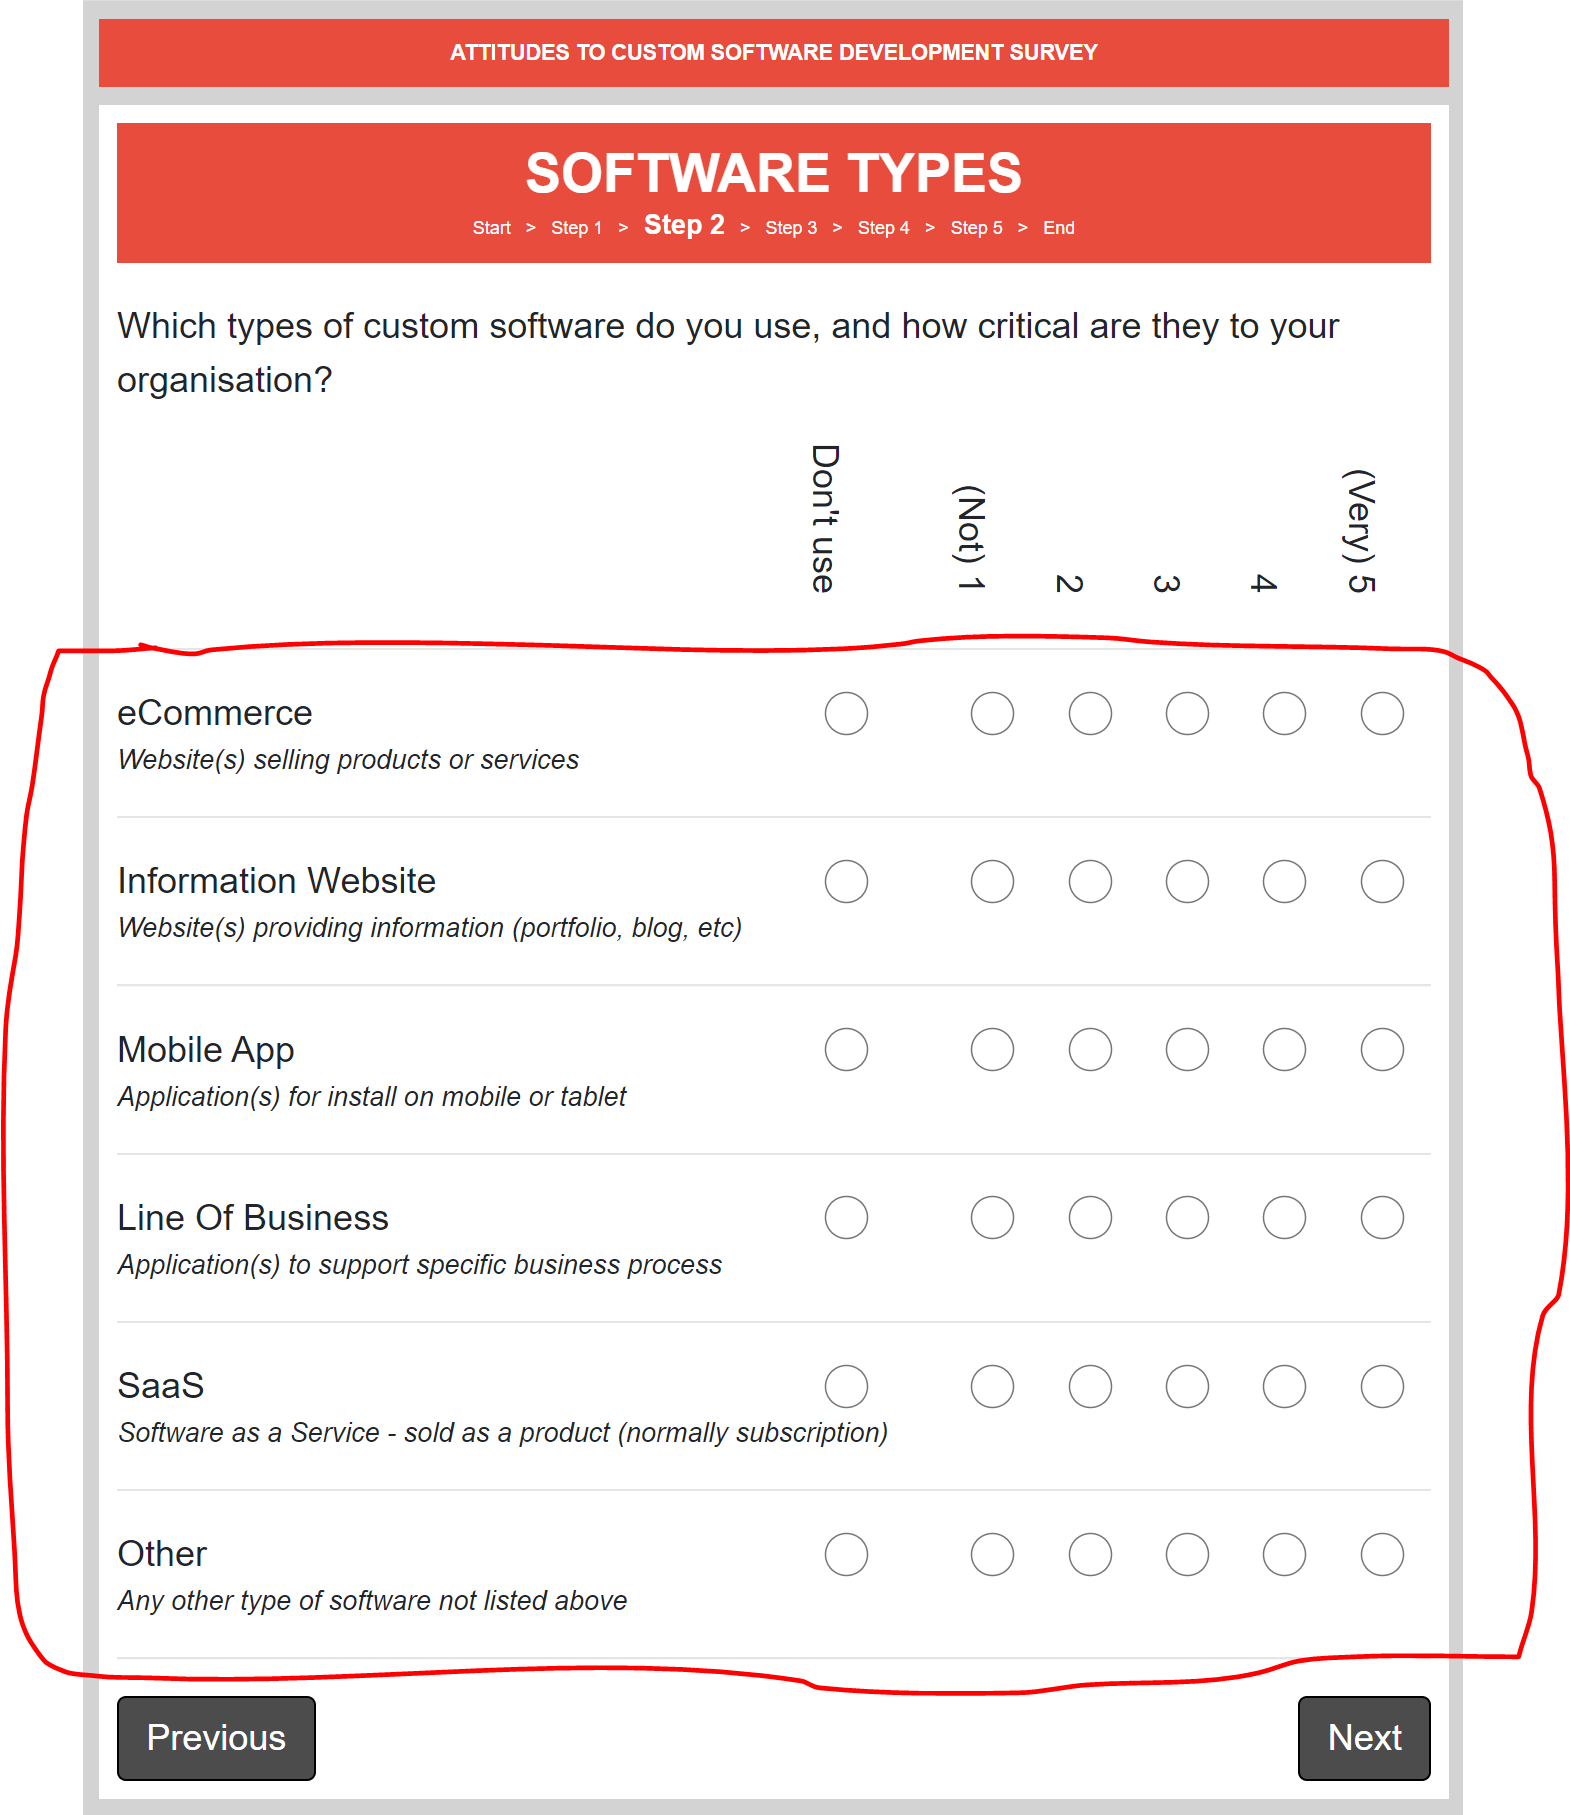
Technically my Snapshot test is more of an integration test - as it uses multiple components, but for regression purposes it’s great. In the test, I define a sample model to use:
@inherits TestComponentBase

<SnapshotTest Description="Options Grid renders correctly">
    <TestInput>
        <CascadingValue Value="EditContext">
            <OptionGrid NotApplicableLabel="N/A" TValue="Model" />
        </CascadingValue>
    </TestInput>
    <ExpectedOutput>
        <div class="option-grid">
            <span class="header"></span>
            <span class="header">N/A</span>
            <span class="header"></span>
            <span class="header">(Not) 1</span>
            <span class="header">2</span>
            <span class="header">3</span>
            <span class="header">4</span>
            <span class="header">(Very) 5</span>
            <hr>
            <span>Value 1 Name</span>
            <input type="radio" name="value-1" checked="">
            <span></span>
            <input type="radio" name="value-1">
            <input type="radio" name="value-1">
            <input type="radio" name="value-1">
            <input type="radio" name="value-1">
            <input type="radio" name="value-1">
            <i class="option-grid-row-description">Value 1 Description</i>
            <hr>
            <span>Value 2 Name</span>
            <input type="radio" name="value-2" checked="">
            <span></span>
            <input type="radio" name="value-2">
            <input type="radio" name="value-2">
            <input type="radio" name="value-2">
            <input type="radio" name="value-2">
            <input type="radio" name="value-2">
            <i class="option-grid-row-description">Value 2 Description</i>
            <hr>
            <span>Value 3 Name</span>
            <input type="radio" name="value-3" checked="">
            <span></span>
            <input type="radio" name="value-3">
            <input type="radio" name="value-3">
            <input type="radio" name="value-3">
            <input type="radio" name="value-3">
            <input type="radio" name="value-3">
            <i class="option-grid-row-description">Value 3 Description</i>
            <hr>
        </div>
    </ExpectedOutput>
</SnapshotTest>

@code
{
    public EditContext EditContext = new EditContext(new Model());

    public class Model
    {
        [System.ComponentModel.DisplayName("Value 1 Name")]
        [System.ComponentModel.Description("Value 1 Description")]
        [System.ComponentModel.DataAnnotations.Required(ErrorMessage = "Value 1 is required")]
        public int Value1 { get; set; }

        [System.ComponentModel.DisplayName("Value 2 Name")]
        [System.ComponentModel.Description("Value 2 Description")]
        [System.ComponentModel.DataAnnotations.Required(ErrorMessage = "Value 2 is required")]
        public int Value2 { get; set; }

        [System.ComponentModel.DisplayName("Value 3 Name")]
        [System.ComponentModel.Description("Value 3 Description")]
        [System.ComponentModel.DataAnnotations.Required(ErrorMessage = "Value 3 is required")]
        public int Value3 { get; set; }
    }
}
Note that use of the EditContext round the sample model. This is provided into the component via the <CascadingValue/>.
I do have other tests that around the sub-components of this component, but having this Snapshot test allows for confidence on regression.
Unit Testing with the NavigationManager
I'd have liked to think that Microsoft would have learnt by now to always use interfaces rather than concrete objects - and in a lot of Blazor that is true.
Unfortunately, not with the NavigationManager.
The NavigationManager is part of Blazor and used to change "page" within the application.
So when it comes to unit testing a component that uses the NavigationManager we have a problem.
Luckily, due to the necessity of having to deal with a history of Microsoft concrete implementations, it’s a fairly simple approach to resolve.
I've simple created an interface for INavigationManager, then a simple wrapper that supports the interface and calls the concrete NavigationManager under the hood, then set up my component to use the INavigationManager:
namespace SoftwareSurvey.Wrappers
{
    public interface INavigationManager
    {
        string Uri { get; }
       void NavigateTo(string uri);
    }
}
using Microsoft.AspNetCore.Components;

namespace SoftwareSurvey.Wrappers
{
    public class NavigationManagerWrapper : INavigationManager
    {
        private readonly NavigationManager NavigationManager;

        public NavigationManagerWrapper(NavigationManager navigationManager)
        {
            NavigationManager = navigationManager;
        }

        public void NavigateTo(string uri) => NavigationManager.NavigateTo(uri);

        public string Uri => NavigationManager.Uri;
    }
}
<div class="form-group navigation-buttons">
    @if (HasPrevious)
    {
        <button type="button" class="btn previous-navigation-button" @onclick="HandlePrevious">Previous</button>
    }
    @if (HasNext)
    {
        <button type="submit" class="btn next-navigation-button" @onclick="HandleNext">Next</button>
    }

    <div class="clear"></div>
</div>

@code {
    [Inject]
    private SoftwareSurvey.Wrappers.INavigationManager NavigationManager { get; set; }

    ...
}
Then when it comes to testing, I can use the Moq library to create Mock<INavigationManager> and test with ease.
Unit Testing with StateHasChanged()
In part 4, I talked about my <PreRenderLoadingMessage /> component; it showed a loading message while the app was starting up (establishing SignalR, etc), then would show the app content when everything was ready.
Unit testing this became a problem due to the use of StateHasChanged().
Ideally I wanted two tests - one to validate the loading message was showing BEFORE the app was ready and one to validate the content was showing AFTER the app was ready.
The problem with the StateHasChange() was that it was forcing the second render before I had a chance to validate the BEFORE state.
So to test, I did something that I generally advise against - added unit testing specific code to the component in question.
To the component I added an extra parameter (UnitTestMode) which would control if the StateHasChanged() would trigger or not.
@if (HasRendered)
{
    @ChildContent
}
else
{
    <LoadingSpinner Title="Loading ..." />
}


@code {
    [Parameter]
    public bool UnitTestMode { get; set; }

    [Parameter]
    public RenderFragment ChildContent { get; set; }

    private bool HasRendered { get; set; }

    protected override void OnAfterRender(bool firstRender)
    {
        if (firstRender)
        {
            HasRendered = true;

            if (!UnitTestMode)
            {
                StateHasChanged();
            }
        }
    }
}
Then in my test, I had more control over the renders. By setting the UnitTestMode to true, I could specify exactly when the second render occurred:
        [Fact]
        public void ShowsLoadingMessage_OnFirstRender()
        {
            using var context = new TestContext();
            context.Services.AddSingleton(new Mock<IEventLoggingService>().Object);

            IRenderedComponent<PreRenderLoadingMessage> cut = context.RenderComponent<PreRenderLoadingMessage>(parameters =>
                parameters
                    .Add(p => p.UnitTestMode, true)
                    .AddChildContent("<div>Hello World</div>")
            );

            Assert.Contains("Loading ...", cut.Markup);
        }

        [Fact]
        public void ShowsChildContent_OnSecondRender()
        {
            using var context = new TestContext();
            context.Services.AddSingleton(new Mock<IEventLoggingService>().Object);

            IRenderedComponent<PreRenderLoadingMessage> cut = context.RenderComponent<PreRenderLoadingMessage>(parameters =>
                parameters
                    .Add(p => p.UnitTestMode, true)
                    .AddChildContent("<div>Hello World</div>")
            );

            Assert.DoesNotContain("<div>Hello World</div>", cut.Markup);

            cut.Render();
            Assert.Contains("<div>Hello World</div>", cut.Markup);
        }
And then just to provide a level of confort, I also test for when the UnitTestMode is off - which we know will automatically re-render due to the StateHasChanged().
        [Fact]
        public void ShowsChildContent_IfInDefaultMode()
        {
            using var context = new TestContext();
            context.Services.AddSingleton(new Mock<IEventLoggingService>().Object);

            IRenderedComponent<PreRenderLoadingMessage> cut = context.RenderComponent<PreRenderLoadingMessage>(parameters =>
                parameters.AddChildContent("<div>Hello World</div>")
            );

            Assert.Contains("<div>Hello World</div>", cut.Markup);
        }
As I say, I would normally advise against adding this sort of change directly to a component - specifically for the purposes of testing - but in this case I believe it is valid and safe enough.
I believe there are plans to allow for an async version of the StateHasChanged() - partly for this, and partly to batch the rendering of multiple changes (for performance) - so I may change to that once it is available.
Other examples
I've not gone into details of how to use bUnit as I believe the documentation site does an excellent job of it.
If however, you want to see more example of how I've used, then look at the github for the Software Survey UnitTests project.
Next time
Next time I'm going to take a look at end to end testing using Selenium and xUnit.